Pages

Wednesday, 22 August 2012

DIY is for Masochists

A few short days ago this was me...


This was the relationship I was having with my computer at the time...


This is was what I secretly (ok, not so secretly) wanted to do to my computer...


Typically I get along quite well with my computer, well until I decided to design my own wedding invites. All ended well but many many hours in front of my computer and many many late nights put a serious damper on our relationship.

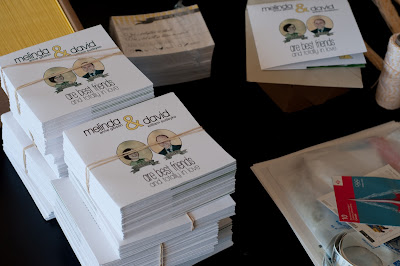
I am happy with how they turned out in the end and I was even able to utilize one of my favourite folds thus avoiding the need for a million and one separate inserts. Just the invite and the RSVP card. Taa Daa!


We wanted something quirky so we decided to get the talented Ashley from Birds of Ashmae to do some custom artwork for us of both the Church we will be getting married in and the Waterfront area where we will be having our reception.


We also loved the crazy water colour portraits from Zsu Zsu Illustrations so much that we decided to use them again on our invites.


Really a labour of love - this is especially true when I feel like I did a gazillion sample print jobs with the print shop.


We spent so much time designing the invite, it would be a shame not to carry the entire theme throughout the whole product - leading to us design and order custom stamps from Canada Post. Surprisingly - custom stamps do not cost a whole lot more than your regular old run of the mill stamps. This allowed me to showcase some of the Polaroid photography I recently did of the Port Credit Waterfront. 


Base art for the custom stamps - taken with my Polaroid Land Camera

The Assembly War Room
Awwww,  how disgustingly sweet
I am into string these days


Sunday, 19 August 2012

Dill-icious

Shower season has begun.

Not only do you get showered with love, affection, and frequently gifts - t's also an opportunity (for me at least) to show off some of my dazzling domestic skills. I used the opportunity to make dilly beans to distribute to my friends and family as a thank-you gift.


Point of Clarification: When I refer to me or I, I really mean David and I. That guys worked his butt off making dilly beans and jam. Good way for me to off load all the tedious tasks.


The dilly beans I made last year got rave reviews, so I am hoping for a repeat performance. Fingers crossed.


Dilly beans are just about the easiest thing in the world to make - just takes a little time.


Ingredients


  • Green beans
  • Dried chilli peppers
  • Fresh dill
  • Fresh garlic
  • Pickling Spice (store bought or homemade)
  • 2 1/2 cups white vinegar (5%)
  • 2 1/2 cups water
  • 1/4 cup pickling salt
  • mason jars (wide mouth jars work best)

First, sterilize your jars (I use a boiling water bath unless I am at David’s and then I use his dish washer because I am LAZY)

Then wash and trim your green beans - feel free to add yellow beans as well.


Some people say to blanche the beans - but I find they aren't as crispy if you do, so instead I put them in a pot and pour hot water over them and then immediately plunge them into cold water.


Pickling Spice
  • 2 tbsp celery seed
  • 2 tbsp mustard seed
  • 2 tbsp pepper corn
  • 2 tbsp dill seed
Combine vinegar, water and salt in a medium saucepan and bring to a boil

To each sterilized jar add:
  • 1 clove garlic (cut in half)
  • 1 dried chilli pepper
  • 1 tsp of pickling spice (store bought or homemade  see ingredients above)
  • Piece of fresh dill (the young dill tastes best – in my opinion)

Make sure to wash and pat dry your dill
(one of the tedious tasks assigned to David)

Pack the beans into the jars - you will no doubt have to trim some to ensure that you have at least 1/2 inch of headspace.

These bad boys seriously need a trim
Pour the boiling brine over the beans, making sure to leave that 1/2 inch headspace. 

Wipe the rims and apply the lids (which have, of course, been sitting in a small saucepan of hot water to soften up) and rings.

Process for 10 minutes in a boiling bath - we are talking 'rollin' with my homies' kind of rolling. That water better be moving! 

Rollin' with my homies (sippin' yak all night, yeah)
Proud Mary keep on burnin'
Rolin', rollin', rollin' on the river
The beans will look shrivelled but worry not they will re-hydrate and look awesome. I compare it to newborn babies, not so cute on day 1 but freakin' adorable afterwards. 

Before moving them – let them sit for 24hr and store them in a dark cool place.
Not exactly a dark place
but how could I take a picture of the finished product in the dark?
We dressed them up to make sure that they would be worthy to hand out to our friends (with a Caesar recipe attached, naturally). 


Queue Caesar...
This was basically my lunch
There was leftover brine, so David made me do this. Disgusting.
Why for the love of God?